Ponte della Maddalena, an HDR photo

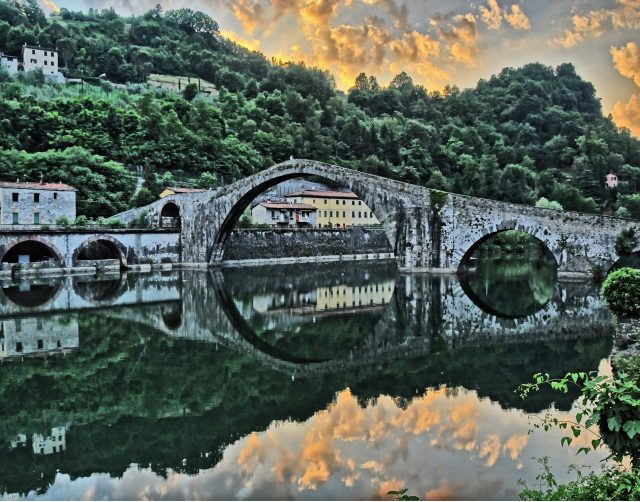
Driving north along the Serchio, from Lucca to Bagni di Lucca, one passes one of my favorite bridges.  The Ponte della Maddalena has stood at Borgo a Mozzano for over 900 years.  If the water is still, the refection of the bridge, with its semi-circular arches,  is spectacular.

screen-shot-2018-09-10-at-1-43-33-pm

The water was very still on 7 June 2015, as I was driving north at 8:30 PM,  The sun was behind hills to the west, and the sunlit clouds were reflecting in the water.  I hit the brakes and pulled into the parking area south of the bridge. Grabbing my camera I snapped a picture of the bridge, The image was disappointing, the clouds were washed out, and the bridge lost in shadows. Luckily, I had been playing around with High Dynamic Range (HDR) photography and had programmed to my Nikon D300  to take a rapid five shot bracketing sequence with full stop steps (exposure value = 0,-2,-1,+1.+2).  I increased the ISO to 1250  as I did not have a tripod with me,  and shot with the widest angle my zoom offered, 18mm or an equivalent full frame 35 mm of ~28 mm.

I combined the five photos using easyHDR. This program has automatic alignment correction for a shift, tilt, and perspective change.  Alignment correction is essential for handheld shots like mine.  Also, it provides 24 presets for combining the images and manual controls.  I used the preset “dynamic-bright,”  The resultant image is much closers to my mind’s eye than any of the individual exposures.  When we look, our eyes adjust for the brightness changes as we scan the scene.  Then the brain integrates the components.

I then used Photoshop to sharpen the image and remove ugly culture features such as high tension wires, power/telephone poles, and wiring.  The final photo is below.

Version 2

A few suggestions:

Although I think easyHDR is a great program, I made my choice over three years ago. There may be a new king of HDR. The Wikipedia HDR entry provides a list of software.

Be sure to set your camera to Aperture Priority when bracketing the exposure to maintain a constant depth of field,  I did not, but got away with it because my 18 mm focal length had a depth of field of 18ft to infinity.


Reflections

One of my favorite photography  tricks is to point my lens at a store window and capture both the window display and the street scene. Here are some examples. Click on the photos to see full screen.


Two windows of Prada, Milan

OLYMPUS DIGITAL CAMERA

Beach restaurant, Barcelona

Paris, where else?

img_0385

Window of “art?” across the street from the Louvre, Paris


 Lucca, Italy

Store Windows Florence, Italy

OLYMPUS DIGITAL CAMERA

 Store across street from ‎Filippo Brunelleschi’s dome, Florence

Two Essays

Earlier this year reading two essays caused me to pose new questions when viewing works of art. The first, by Teju Cole, Shadows in São Paulo,  the second by André Aciman, My Monet Moment.

Both authors journey to find the source location of an image.  Cole is chasing the source of a René Burri photograph in San Paulo,  and Aciman is trying to understand the scene which was the source of a Monet Painting.

Cole asks, can we identify the location and subject of photos in the real world.  Fifty years after the photo was taken, he tries and succeeds.  However, his initial efforts are complicated by assuming the lens focal length was close to “normal”.  For more background, click here “Men on a Rooftop“.

Aciman discovers that elements of a painting may be changed from the real world. Elements of the painting are rearranged for a better visual composition.  For a look at the painting,  Maybe it’s the right one ;), click here.

As these essays illustrate, when looking at a painting or photograph several questions may increase your enjoyment or understanding.

  1. Where is the source of this image?
  2. Would my eye see the same perspective, or is it wider or foreshortened?
  3. Are the elements of image grouped in a special way to enhance the composition?

Non Photo-Realistic Mona Lisa

Over the last two years, I have been writing computer applications in Python as a hobby.  During this period the possibility of using Python for image processing has been in the back of my mind.  At first, Python, since it is interpreted, seemed a totally inappropriate language.  Then I started using the NumPy library.  NumPy provides Python a capability very similar, although very different in syntax, to the commercial software package Matlab.    All I needed was an idea for my first image processing application.

A paper Modular Line-Based Halftoning via Recursive Division, provided the spark.  See Proceedings of the Workshop on Non-Photorealistic Animation and Rendering, 2014 Vancouver, published by ACM New York (For a copy of the paper click on the title above and then follow a second link to get a free copy from the ACM library)

The Photo to the right is the result of my first image processing attempt.  It consists totally of black rectangles. Each rectangle contains the same amount of “black ink” in the original photo. The first step sliced the photo into five rectangles of equal black ink, each of these was sliced into five more, then five more …

The final list of divisors used was 5,5,5,5,3,3,2,2,2,2, generating ninety thousand rectangles. Total execution on my old 2011 MacBook Pro is 10 seconds. Clearly, Python with NumPy is an acceptable image processing platform.

My other favorite Python concept is Cairo. Cairo is a drawing package. Think of it like an alternative PostScript. The original form of the image on the right above was Scalable Vector Graphics (SVG)
Cairo supports many “back-ends” and one of them is SVG. Click here to see a full rez of the right image.

My next version will have better imaging slicing to break up patterns. Also I plan to upload an iPython/Jupyter Notebook implementation.

Thats all for now.  The next section describes a few of the coding details.  If your not interested skip to the bottom and leave your comments.

Software Details

My function sliceIm, the heart of this process, follows:

def sliceIm(image, rects, n):
   nxtrects = []
   for rect in rects:
      top = rect[0]
      bottom = rect[1]
      left = rect[2]
      right = rect[3]
      im = image[top:bottom,left:right]
      if (bottom - top) > (right - left):
         rowsum = im.sum(axis=1)
         cumrowsum = rowsum.cumsum()
         xr = np.amin(cumrowsum)
         mr = (np.amax(cumrowsum)-xr)/n
         for i in range(1,n):
            t = np.amin(np.nonzero(cumrowsum>=(xr+(mr*(i-1)))))
            b = np.amin(np.nonzero(cumrowsum>=(xr+(mr*i))))
            nxtrects.append( [top + t, top + b, left, right] )
         nxtrects.append( [top + b, bottom , left, right] )
      else:
         colsum = im.sum(axis=0)
         cumcolsum = colsum.cumsum()
         xc = np.amin(cumcolsum)
         mc = (np.amax(cumcolsum)-xc)/n
         for i in range(1, n):
            r = np.amin(np.nonzero(cumcolsum>=(xc+(mc*(i-1)))))
            l = np.amin(np.nonzero(cumcolsum>=(xc+(mc*i))))
            nxtrects.append( [top, bottom, left + r, left + l] )
         nxtrects.append( [top, bottom, left + l, right] )
  return nxtrects
[notes]
image:   NumPy array of pixels (0.0 is white 1.0 is black)
rects:   lists of lists. each element is a 
         rectangle [top, bottom, left, right]
         example from second slicing of Mona Lisa:
         [[0, 269, 0, 997], [269, 537, 0, 997],
         [537, 792, 0, 997], [792, 1015, 0, 997],
         [1015, 1246, 0, 997]]
n:       number of slices to divide each rectangle
line 8:  im = image[top:bottom,left:right] 
         im is assigned a slice of image
         The slice is not copied, im is just mapped to the slice
         NumPy Magic  
line 10: rowsum = im.sum(axis=1) n by m slice summed over
         each row returning an n by 1 array
line 11: cumrowsum = rowsum.cumsum()  over slice of
         sum of all rows above
line 15: np.nonzero(cumrowsum>=(xr+(mr*(i-1)))))
         returns and n by 1 0/1 result for
         row by row comparison
         t is the min row or the t row of the new slice
line 16: finds b or the bottom of the new slice
line 20-28 repeat structure of line 10-18 for new horizontal slice

Finally here is lowest level cairo drawing routine for drawing all the rectangles.

def drawImg(rects, surface, ctx):
    for rect in rects: 
        top = rect[0]*2
        bottom = rect[1]*2
        left = rect[2]*2
        right = rect[3]*2
        ctx.rectangle(left, top, right-left, bottom-top)
        ctx.stroke()
[notes]
rects:   lists of lists. each element is a 
         rectangle 
surface: a Cairo drawing surface
ctx:     a Cairo drawing context